One of the most important things about a blog is encouraging people to read it. A vital part of this is ensuring that links to blog posts look as appealing as possible to prospective readers. If you look at Twitter or any other social media site, you’ll see that links are almost always accompanied by an image, and for blog posts this is usually just the logo of the blog. However, it’s much more appealing to have a custom image for each blog post, containing the title of the post and the date it was published in a design that fits the blog’s branding.
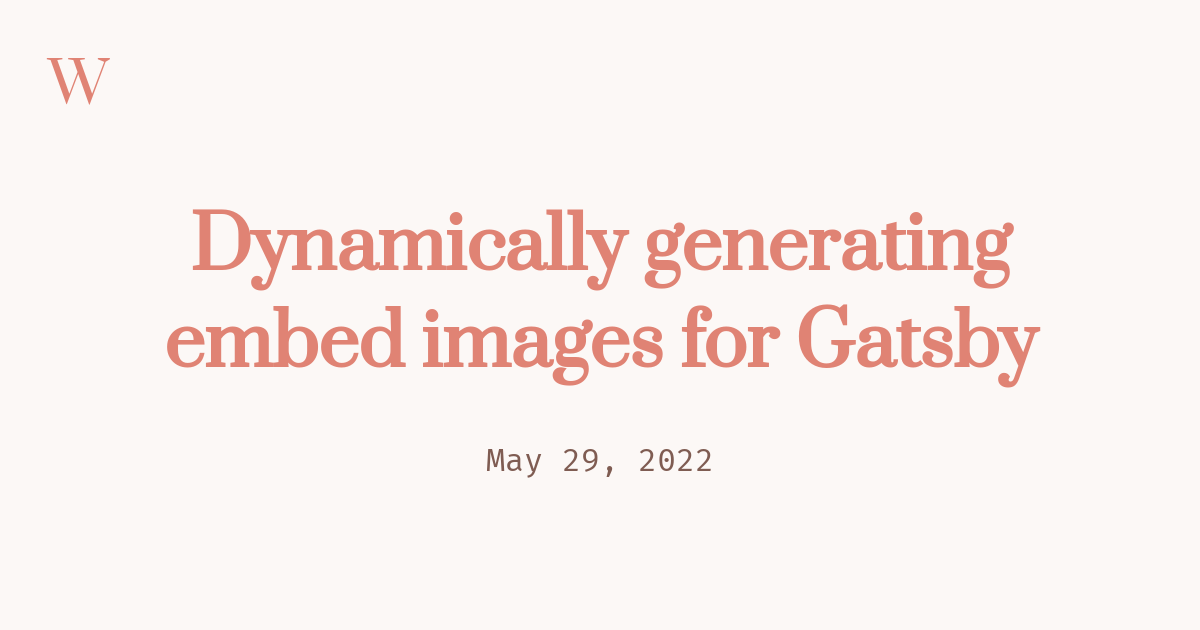
In this post, we’ll be discussing my favourite technique for dynamically generating these images in the context of a Gatsby blog, but much of this is also applicable to other static site generators. The final result looks like this:
The Obvious Approach
For me, the obvious approach to this problem was just to write a simple Python script that generates the images at build time using the Python Imaging Library. This is what I did for my first attempt, and at first it does seem like a resonable idea, but I ran into a lot of issues.
With longer titles, such as that of this post, the text needs to be dynamically wrapped to fit the image. This is a problem because PIL’s text support is very limited, and it required a lot of maths to calculate the correct position of the text. Secondly, PIL doesn’t support text anti-aliasing, so the text looked jagged and not very nice. I’m sure both of these problems could be overcome by using a better Python library, but I couldn’t find one to do what I wanted, so I ended up going down a completely different route.
The Solution
Since I’m using Gatsby (you can read about how I set it up in my last blog post), the build process can easily be extended with JavaScript or TypeScript code, so it would make the most sense to use one of these languages to generate the images. While I was struggling with text wrapping and anti-aliasing, I found myself wishing I could just define the text style and wrapping in CSS and HTML - and then I realised, why couldn’t I do exactly that?
Puppeteer is a JavaScript library which allows us to control a headless Chromium browser with code. I decided to use it to render and then screenshot an HTML file, which allowed me to do all the styling in CSS. I installed Puppeteer as a development dependency in my project, and then created the gatsby-node.ts file, which allows us to hook into the Gatsby build process and perform GraphQL queries.
Firstly, we need to write a GraphQL query to get the title, date and slug of each blog post. I assigned this to the query variable.
{
  posts: allMarkdownRemark(
    filter: { fileAbsolutePath: { regex: "/blog/" } }
  ) {
    edges {
      node {
        frontmatter {
          slug
          title
          date(formatString: "MMMM DD, YYYY")
        }
      }
    }
  }
}
The onPostBuild function is called after the core Gatsby build process has finished, so it’s the ideal place to add some custom code. We need to perform the GraphQL query, set up the Puppeteer instance, set the viewport size, give the title and date data to the HTML template (we’ll talk about that next), and finally render the image and save it in the build output folder. We’ll name each image with the slug of the post, so the pages can find their corresponding images easily.
const fs = require("fs");
const puppeteer = require("puppeteer");

exports.onPostBuild = async ({ graphql }) => {
  // Perform the GraphQL query.
  await graphql(query).then(async result => {
    let posts = result.data.posts.edges.map(({ node }) => node);

    // Set up the Puppeteer instance.
    let browser = await puppeteer.launch();
    let page = await browser.newPage();
    page.setViewport({
      width: 1200,
      height: 630
    });

    // Create the output directory if it doesn't exist.
    if (!fs.existsSync("./public/images/blog")) {
      fs.mkdirSync("./public/images/blog");
    }

    // Loop through the posts, generate each image and save them.
    for (let post of posts) {
      let title = encodeURIComponent(post.frontmatter.title);
      let date = encodeURIComponent(post.frontmatter.date);
      let slug = post.frontmatter.slug.split("/").pop();

      await page.goto(`file:///${__dirname}/images/embed.html?title=${title}&date=${date}`);
      await page.screenshot({ path: `./public/images/blog/${slug}.png` });
    }
  })
}

// The GraphQL query can be found above.
const query = "--snip--";
That’s all the code we need in gatsby-node.ts, so now we can design the basic HTML template.
The HTML Template
You can design your HTML template however you like, so I won’t discuss the CSS styling here. However, getting the title and date data into the template from the query string is quite interesting, so I’ll show you how I did it.
<main>
  <div class="title">
    <h1>
      <script>
        window.__params = new URLSearchParams(window.location.search);
        document.write(window.__params.get("title") ?? "Untitled");
      </script>
    </h1>
  </div>

  <div class="date">
    <script>
      document.write(window.__params.get("date") ?? "Unknown Date");
    </script>
  </div>
</main>
As you can see, we use the URLSearchParams API to get the title and date data from the query string. We then write it to the document using document.write. Once the document is loaded, Puppeteer will take a screenshot of it.
Configuring the Embed Images
Now we have the embed images automatically generated and placed in a folder each time the site is built, we need to configure the blog pages to use them. Open Graph is a standard for adding rich metadata to websites, and Twitter for whatever reason has its own standard for embedding images too, so I implemented both of these. This is done by adding <meta> tags to the <head> of each blog page, and for this I needed to use React Helmet as well as its corresponding Gatsby plugin. Without the plugin, the helmet data would be added to the page at runtime, which is useless for crawlers which don’t render the page or run any JavaScript.
I created a variable pathToEmbed to store the path to the embed image that we just generated:
const pathToEmbed = `https://whenderson.dev/images/blog/${frontmatter.slug.split("/").pop()}.png`;
Then, in the Helmet component, we add the following tags:
{/* Open Graph tags */}
<meta property="og:title" content={frontmatter.title} />
<meta property="og:type" content="article" />
<meta property="og:url" content={`https://whenderson.dev${frontmatter.slug}/`} />
<meta property="og:site_name" content="William Henderson" />
<meta property="og:image" content={pathToEmbed} />
<meta property="og:image:width" content="1200" />
<meta property="og:image:height" content="630" />
<meta property="og:description" content={frontmatter.description} />
<meta property="description" content={frontmatter.description} />

{/* Open Graph article tags */}
<meta property="article:author" content="William Henderson" />
<meta property="article:published_time" content={frontmatter.metaDate} />
<meta property="article:modified_time" content={frontmatter.metaDate} />

{/* Twitter Card tags */}
<meta name="twitter:card" content="summary_large_image" />
<meta name="twitter:site" content="@w-henderson" />
<meta name="twitter:title" content={frontmatter.title} />
<meta name="twitter:description" content={frontmatter.description} />
<meta name="twitter:image" content={pathToEmbed} />
<meta name="twitter:url" content={`https://whenderson.dev${frontmatter.slug}/`} />
Finally, everything is set up, and if you share a link to this blog now, the embed image will be shown!
Conclusion
Using Puppeteer to dynamically generate embed images seemed at first a bit strange, but it turned out to be a lot easier and more effective then I thought. Since it uses purely JavaScript, it works perfectly when deploying using Cloudflare Pages, and it’s also fairly fast. I hope this post has been interesting and useful, and please share it with others who may be interested - you’ll get to see the embed images in action!