When talking about multi-threaded applications and concurrency, we often hear the term “atomic”. But what does this mean, and why is it important? In this post, we’ll discuss what atomic operations are, why they are needed, and then implement them from scratch in Rust.
What is an atomic operation?
In the context of multi-threading, an operation is atomic if it cannot, from the perspective of other threads, be split into smaller steps. The name atomic comes from the Greek word atomos, meaning indivisible. An atomic operation cannot be interrupted by other threads and, importantly, cannot be observed in a partially completed state.
Why are atomic operations needed?
Let’s say we have a function which increments a global counter.
static mut COUNTER: usize = 0;

fn increment_counter() {
    unsafe { COUNTER += 1; }
}
When this code is compiled, the compiler generates the following assembly code.
add QWORD PTR [COUNTER], 1
This instruction adds the value 1 to the quad-word (64-bit) value at the address COUNTER. When the CPU executes this instruction, it has to first get the value from the memory location, then add one to it, then store the result back in the memory location. This works perfectly well when only one thread or CPU core is performing the operation, but when multiple threads are doing it, the problem begins to become apparent. This is shown in the following diagram, where two threads are executing this code at the same time. COUNTER is initially set to 4.
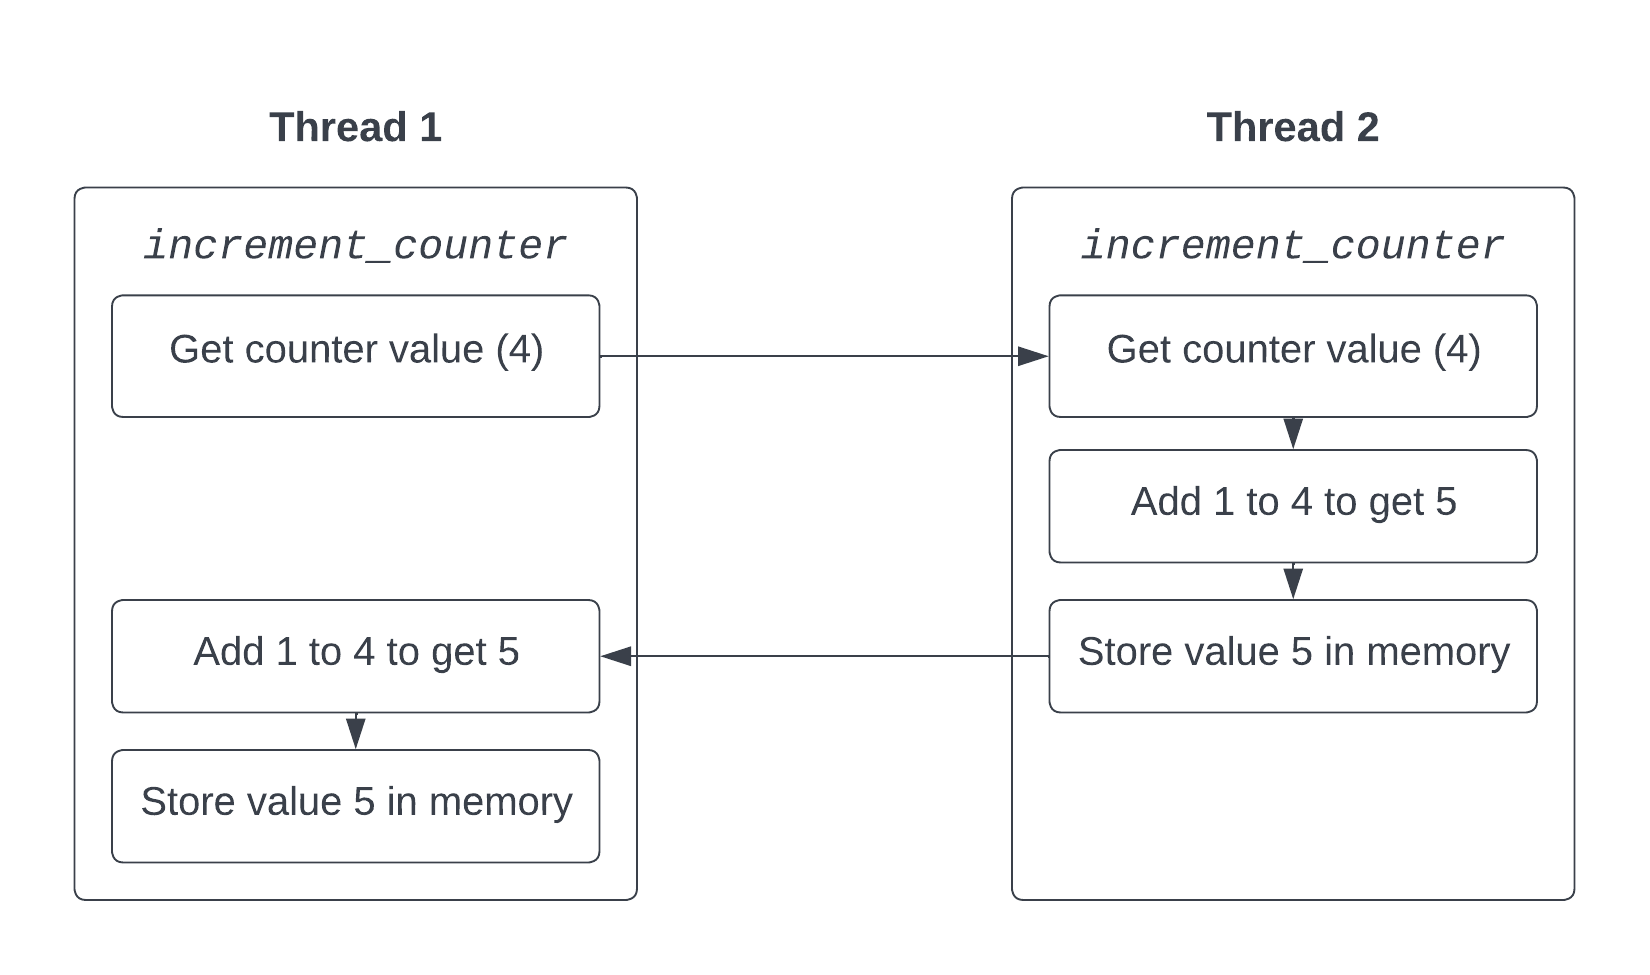
As you can see, after both threads have finished executing the code, the value of COUNTER has only increased by one, despite both threads believing that they have incremented the counter. This is because the operation is not atomic: the second thread incremented the counter by one half way through the first thread’s operation, causing one of the increments to be effectively lost. You probably noticed that in our code above, we had to use the unsafe keyword because safe Rust won’t let us run into this problem!
Now let’s look at the same diagram, but with a simplified atomic operation.
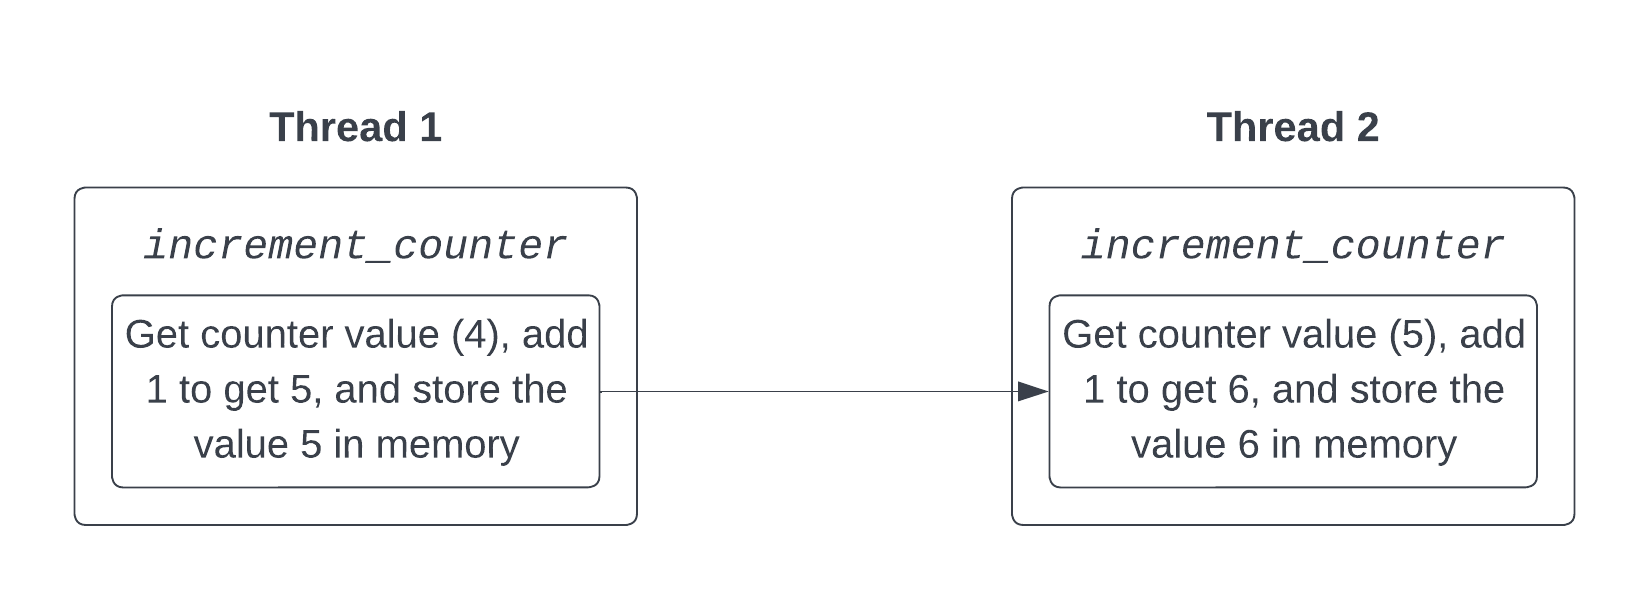
While there are still three steps to the operation, from the perspective of the other thread, they all happen at a single point in time. The value is either observed before the operation has started or after it has finished, but never in the middle. This prevents the second thread from seeing the value of COUNTER half way through the first thread’s operation, and hence the increment cannot be lost.
Now we’ve got a basic understanding of what atomic operations are and why they are needed, let’s look at how we can implement them in Rust.
Implementing AtomicUsize from scratch
Let’s start by creating a struct AtomicUsize which contains a single usize value. Rust doesn’t know that our implementation of this struct will be safe to use in a multi-threaded context, so we’ll need to use the unsafe keyword to tell the compiler that we know what we’re doing. We also need to manually implement the Send and Sync traits so users of the struct can use it between threads.
use std::cell::UnsafeCell;
use std::arch::asm;

pub struct AtomicUsize {
    inner: UnsafeCell<usize>,
}

unsafe impl Send for AtomicUsize {}
unsafe impl Sync for AtomicUsize {}

impl AtomicUsize {
    // todo
}
The usize needs to be within an UnsafeCell to effectively opt out of Rust’s borrow checker in order to gain mutable access to the value from multiple threads. UnsafeCell simply provides a get method which returns a mutable reference to the contained value, which can be called (albeit with an unsafe block) as many times and from as many threads as we like.
Now let’s think about what methods we need to implement on our AtomicUsize type. We’ll be modelling the interface on the standard library’s AtomicUsize, so we’ll use the same names. As well as getting the value, which is called load, we also need to be able to set the value, which is called store. Being able to atomically increment the value is also important as we discussed earlier, so we’ll implement that too under the name fetch_add. The final two atomic operations we’ll be implementing are swap and compare_exchange. The former is used to atomically set the value of the variable while returning the old value, while the latter is used to do the same, but only if the current value matches a given expected value. compare_exchange is one of the most powerful atomic operations, as we can use it to implement a mutual exclusion lock - but that’s something covered in the next post.
Implementing AtomicUsize::new
Creating a new AtomicUsize is very simple with a new method which takes a value to store in the UnsafeCell. We can make this a const function so we can use it to initialize static variables, a very common use case for atomic types.
pub const fn new(v: usize) -> Self {
    Self {
        inner: UnsafeCell::new(v),
    }
}
Implementing AtomicUsize::load
Since our implementations of all the methods which change the value will be atomic, the CPU won’t let us observe the value in the middle of an operation. Therefore, to load the value, we can simply return the current value of the UnsafeCell.
pub fn load(&self) -> usize {
    unsafe { *self.inner.get() }
}
Implementing AtomicUsize::store
In order to atomically store a value, we need to explicitly tell the processor that we want the operation to be atomic. For this reason, we need to use Rust’s asm! macro to write some assembly code. The instruction we need to use is xchg, which exchanges two values. Since only one of these values is allowed to be in memory (the other must be either in a register or immediate), we’ll use the macro to specify that the value we are storing should be placed in a register before we call the xchg instruction.
We also need to tell the CPU that we want the operation to be atomic. This is done by using the lock prefix.
It’s important to note that our implementation of the following atomic operations will only work on x86 systems, since the CPU instruction set is different for other architectures.
pub fn store(&self, v: usize) {
    unsafe {
        asm!(
            "lock; xchg [{address}], {v}",
            address = in(reg) self.inner.get(),
            v = in(reg) v
        );
    }
}
The square brackets around {address} are used to specify that it should be treated as a pointer instead of a value. You’ll see this in a lot of the other implementations.
Implementing AtomicUsize::fetch_add
Like with storing a value, it is also necessary to specify that we want to atomically add to a value. We need to use the xadd instruction, which exchanges two values and loads their sum into the location of the former. Again, the lock prefix is necessary to indicate that we want the operation to be performed atomically.
pub fn fetch_add(&self, mut v: usize) -> usize {
    unsafe {
        asm!(
            "lock; xadd [{address}], {v}",
            address = in(reg) self.inner.get(),
            v = inout(reg) v,
        );
    }

    v
}
Implementing AtomicUsize::swap
Implementing swap is the same as store, but we want to return the value that was previously stored. For this reason we use inout instead of in in the asm! macro to indicate that we want to update the variable v with the value of the register after the xchg instruction, instead of disregarding it.
pub fn swap(&self, mut v: usize) -> usize {
    unsafe {
        asm!(
            "lock; xchg [{var}], {v}",
            var = in(reg) self.inner.get(),
            v = inout(reg) v
        );
    }

    v
}
Implementing AtomicUsize::compare_exchange
This is the most complex operation we’ll be implementing in this post. We’ll be using the cmpxchg instruction with the lock prefix, which takes two operands, the destination and the source. It first compares the value of the destination with the value stored in the accumulator, and if they are equal, the CPU’s ZF (zero flag) is set (to 1) and the value of the source is stored in the destination. If the values are not equal, ZF is cleared (set to 0) and the value of the destination is stored in the accumulator.
This is quite complicated to understand without some pseudocode, so let’s look at some pseudocode for the operation cmpxchg [dest] src.
temp = *destination

if accumulator = temp:
    ZF = 1
    *destination = source
else:
    ZF = 0
    accumulator = temp
In effect, after the operation is complete, the value of the accumulator represents the previous value of the destination, and the value of the ZF indicates whether the operation succeeded (i.e. the value in the source was added). We make use of Rust’s Result type in the following code to represent this.
We also need to use the sete instruction to get the value of the ZF after the operation. This sets the value of its one operand to the value of the ZF.
pub fn compare_exchange(&self, current: usize, new: usize) -> Result<usize, usize> {
    let zf: u8;    // the value of the zero flag
    let result: usize; // the value of the destination before the operation

    unsafe {
        asm!(
            "lock; cmpxchg [{address}], {new}", // the operation
            "mov {result}, rax", // store the accumulator value in `result`
            "sete {zf}", // store the ZF value in `zf`
            address = in(reg) self.inner.get(),
            new = in(reg) new,
            zf = out(reg_byte) zf,
            result = out(reg) result,
            in("rax") current, // place `current` in the accumulator to start
        );
    }

    if zf == 1 {
        Ok(result)
    } else {
        Err(result)
    }
}
Testing the AtomicUsize implementation
At the very start of this post, we discussed why atomic operations are needed with a simple counter example. We’ll now test our fetch_add implementation with the same example to check that it solves the problem of lost increments, but first we’ll see what happens if we use a non-atomic operation.
The code below spawns four threads, each of which increments the global counter by 1 for a million iterations. The test then waits for all the threads to finish, and finally checks that the counter holds the correct value of four million.
static mut COUNTER: usize = 0;

#[test]
fn test_fetch_add() {
    let mut threads = Vec::new();

    for _ in 0..4 {
        threads.push(std::thread::spawn(|| {
            for _ in 0..1_000_000 {
                unsafe { COUNTER += 1; }
            }
        }));
    }

    // Wait for all threads to finish
    for thread in threads {
        thread.join().unwrap();
    }

    assert_eq!(unsafe { COUNTER }, 4_000_000);
}
If we run this test with cargo test, we’ll see that it fails:
test test_fetch_add ... FAILED

failures:

---- tests::test_fetch_add stdout ----
thread 'tests::test_fetch_add' panicked at 'assertion failed: `(left == right)`
  left: 1321561,
 right: 4000000'

test result: FAILED. 0 passed; 1 failed; finished in 0.26s
For the reasons we discussed earlier, the counter only holds the value of 1,321,561 - a lot less than four million! If we run the test multiple times, we’ll get a different, incorrect result. While it is technically possible that the test will give us the correct result, it is incredibly unlikely.
Let’s replace the COUNTER variable with our AtomicUsize implementation and see what happens.
static COUNTER: AtomicUsize = AtomicUsize::new(0);

#[test]
fn test_fetch_add() {
    let mut threads = Vec::new();

    for _ in 0..4 {
        threads.push(std::thread::spawn(|| {
            for _ in 0..1_000_000 {
                COUNTER.fetch_add(1);
            }
        }));
    }

    // Wait for all threads to finish
    for thread in threads {
        thread.join().unwrap();
    }

    assert_eq!(COUNTER.load(), 4_000_000);
}
When we run this test, it passes! The counter now holds the correct value of four million. This shows that our fetch_add implementation is correct.
running 1 test
test tests::test_fetch_add ... ok

test result: ok. 1 passed; 0 failed; finished in 0.55s
You may have noticed that the test takes more than twice as long as the non-atomic one did. This is because atomic operations are a lot more expensive than non-atomic operations, as they require the CPU to perform additional operations to ensure their atomicity.
Conclusion
In this post, we’ve learnt about atomics and how to implement them from scratch in Rust. In this process of writing this post, I’ve learnt so much more about atomics, how they work, and how they can be used correctly, and I hope some of that information has been conveyed to you in reading it. If you found this post informative, please share it with others who may be interested! If you want to learn more, click one of the links below, or read the next post, How are mutexes implemented in Rust?.
References
- Jaroslav Sevcik, C/C++11 mappings to processors
- Mark Batty et al., Mathematizing C++ Concurrency, 2011
- Felix Cloutier, x86 and amd64 instruction reference, 2019
- Internal Pointers, Lock-free multithreading with atomic operations, 2019
- Jeff Preshing, Atomic vs. Non-Atomic Operations, 2013